Où photographier Ceillac, le lac Miroir et le lac Sainte-Anne ? - AluArtMountains

Where to photograph Ceillac, Lac Miroir, and Lac Sainte-Anne?

Published on July 30, 2026

At Ceillac, two geographically very close lakes nevertheless produce almost opposite photographs. Lac Miroir, also known as Lac des Prés Soubeyrand, is nestled among larches and alpine pastures. Its water can extend the trees, slopes, and sky in a soft composition. Higher up, Lac Sainte-Anne opens into a mineral cirque dominated by the peaks of Font Sancte: the colors become colder, the lines more abrupt, and the atmosphere distinctly more alpine.

This difference is precisely what makes the area interesting. A single outing can combine forest, waterfalls, reflections, a turquoise lake, scree, and high cliffs. However, it requires choosing a priority: waiting for calm water at Lac Miroir, reaching Sainte-Anne under still balanced light, or planning a loop that tells the complete transition between the two landscape levels.

This guide details the viewpoints, light, seasons, focal lengths, and useful itineraries for photographing the lakes of Ceillac. It complements our general guide to the Queyras, the first guide on the Col d'Izoard and the Casse Déserte, and the selection of Queyras photo prints.

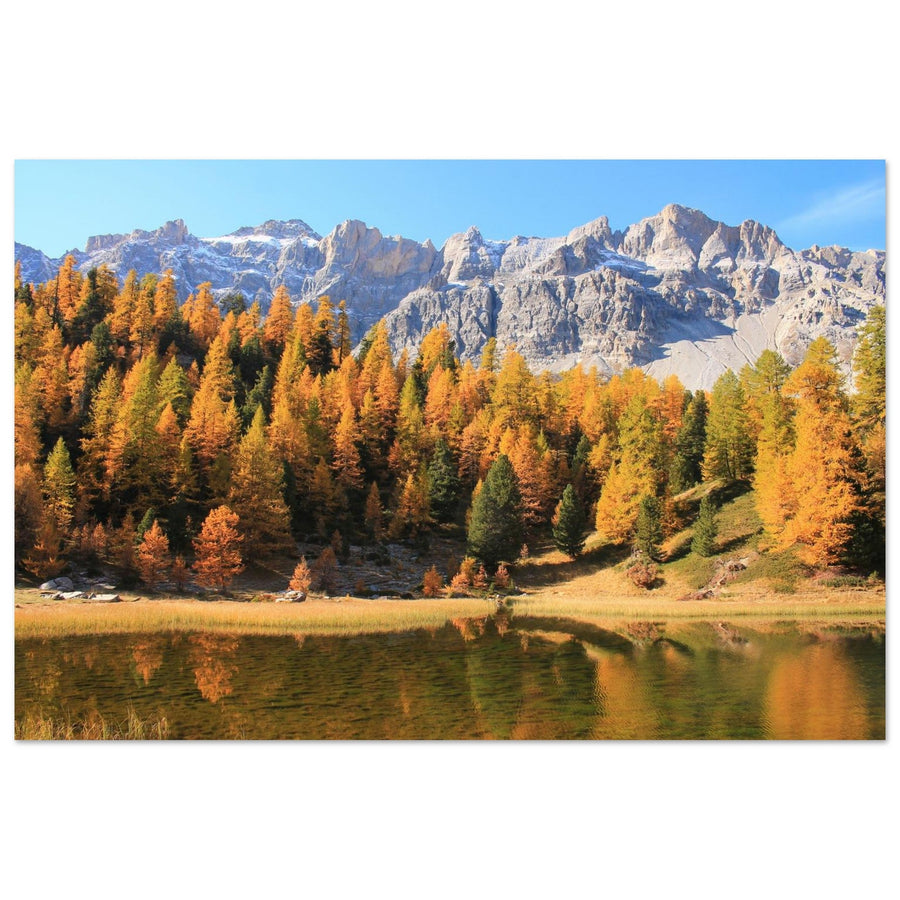
Photo print of Lac Miroir in Ceillac surrounded by larches in the Queyras
At Lac Miroir, the larches, grassy banks, and Queyras peaks are reflected in the calm water. Photography by Picturereflex. Discover this Lac Miroir photo print.

The essentials in 30 seconds

  • Two atmospheres: reflections, larches, and gentle banks at Lac Miroir; turquoise water, scree, and high mountains at Lac Sainte-Anne.
  • Best time at Lac Miroir: early morning, when the wind is still light and there are fewer people.
  • Best light at Sainte-Anne: side light or slightly overcast sky to retain detail in the water and cliffs.
  • Useful focal lengths: 16–35 mm to include the banks, 24–70 mm to balance lake and peaks, 70–200 mm to isolate Font Sancte and mineral details.
  • Full itinerary: the official loop connecting the two lakes is approximately 13.3 km with nearly 800 m of positive elevation gain; photo time is in addition to walking time.
  • Key tip: don't look for the same image at both lakes. Lac Miroir works by superposition and reflection; Sainte-Anne by contrast of materials, colors, and scale.

Why photograph the lakes of Ceillac?

The Mélézet area is one of the rare places in the Queyras where a hike allows you to clearly cross several landscape levels. The departure is in a forest and torrent environment. The ascent then reaches the meadows and larches of Lac Miroir, before continuing to Lac Sainte-Anne and descending again. For a photographic series, this progression offers more than a succession of beautiful viewpoints: it provides a narrative.

Lac Miroir is located at an altitude of approximately 2,214 meters according to the official itinerary. Its banks are still vegetated, and its environment retains a relatively intimate scale. The trees partially enclose the landscape, the grasses create soft lines, and the water reacts strongly to the wind. A small change in framing is therefore enough to completely alter the image.

Lac Sainte-Anne, around 2,415 meters, works in reverse. The view extends towards the cliffs, schists, scree, and peaks of Font Sancte. The chapel provides a discreet human landmark, but most of the scene remains mineral. The lake does not necessarily have to occupy the entire frame: a band of turquoise water can be enough to add depth to a composition dominated by rock.

The main pitfall is to treat the two lakes as simple postcards. At Lac Miroir, perfect symmetry is not always the strongest solution. At Sainte-Anne, a very wide angle can reduce the peaks and make the cirque less impressive. Photography gains personality when a clear intention is chosen: forest calm, opposition between water and stone, shoreline detail, changing weather, or human scale.

Lac Miroir or Lac Sainte-Anne: which to choose?

Area Photographic interest Best light Useful focal lengths Watch out for
Lac Miroir Reflections, larches, grasses, calm atmosphere, and horizontal compositions Dawn, windless morning, autumn 16–35 mm, 24–70 mm Surface quickly rippled by wind and sometimes cluttered banks
Lac Sainte-Anne Turquoise water, mineral cirque, Font Sancte, chapel, and high mountain feel Late morning, side light, overcast sky 24–70 mm, 70–200 mm Strong contrasts and peaks reduced by too wide a framing
Path between the lakes Forest-pasture-scree transition, waterfalls, silhouettes, and valley views Morning, filtered light, autumn 24–70 mm Ski resort installations to exclude or intentionally integrate
Chapel Sainte-Anne Human scale and heritage landmark facing the lake Soft or side light 35–85 mm Respect the place and avoid intrusive framing during gatherings
Col Girardin slope Panoramic view, cirque interpretation, and wider backgrounds Morning or late afternoon depending on orientation 24–70 mm, 70–200 mm Longer itinerary and high-altitude terrain

For a first visit, the choice mainly depends on the light and available time. A calm morning favors Lac Miroir. A more overcast or slightly windy day can be better exploited at Sainte-Anne, where the composition relies less on a perfectly smooth surface. When weather and physical condition permit, the loop of the two lakes remains the most complete solution.

Access and organization of the outing

The most complete official itinerary starts from the Pied du Mélézet area, above Ceillac. It first leads to the forest and waterfalls, reaches Lac Miroir, then allows you to continue to Lac Sainte-Anne before descending. Chemins des Parcs indicates a loop of approximately 13.3 kilometers, with nearly 800 meters of positive elevation gain, classified as difficult. The announced time corresponds to walking: to photograph both lakes seriously, you need to allow a significant margin.

Another approach allows you to primarily target Sainte-Anne from the bottom of Chaurionde. It limits the photographic interest of Lac Miroir but may be suitable if you want to dedicate more time to the mineral cirque, the chapel, or an extension towards Col Girardin. Access conditions, parking, and shuttles may change: local information should be checked before departure.

For an outing focused on reflections, leaving early is almost essential. You need to reach Lac Miroir before air movements begin and before the main flow of hikers arrives. However, leaving too early without knowing the terrain increases constraints: darkness in the forest, humidity, cold, and more difficult scouting of the banks. A first daytime visit can be useful before returning at dawn.

Don't build too tight a schedule. A thirty to forty-five minute stop at Lac Miroir can become much longer if the wind gradually drops. At Sainte-Anne, clouds and shadows move quickly over the cliffs. Observing these changes is part of the photo outing.

Useful official links before the outing

Photographing Lac Miroir: reflections, larches, and banks

Lac Miroir owes its interest to the combination of three elements: water capable of reflecting the landscape, still present vegetation, and peaks close enough to structure the background. The result may seem obvious, but framing requires discipline. The banks are irregular, trees can overlap, and the surface is not always perfectly calm.

Start by visually circling the lake without immediately setting up your tripod. Locate a bank that creates a legible line rather than a cluster of grasses. Also observe areas where the larches stand out from each other. An effective composition can use an isolated tree as a point of balance, a curve of the bank as an entry into the image, or a small opening towards the peaks.

Central symmetry works when the reflection is clean and the main subject remains clearly identifiable. If the sky is empty or the upper part lacks relief, shift the horizon and give more space to the water. Conversely, when the reflection is blurred by small ripples, reduce its importance and use it as a texture rather than a perfect double of the landscape.

Photo tips for Lac Miroir

  • First work with a 24–70 mm lens to test several balances before taking out the super wide-angle.
  • Keep a fast enough shutter speed if the grasses are moving, even when the water appears calm.
  • Check the horizon: a slight tilt becomes very visible with a reflection.
  • Avoid crushing the banks and wet areas to gain a few centimeters of framing.
  • Try a vertical framing with a bank in the foreground when horizontal symmetry seems too expected.
Photo print of Lac Miroir in Ceillac with its reflections and larches
The reflection does not necessarily have to be perfectly symmetrical: irregularities of the bank and ripples also give the scene a natural feel. Photography by Picturereflex.

Our field tip

At Lac Miroir, wait a few minutes before concluding that conditions are bad. The wind can operate in sequences: a choppy surface sometimes becomes calm very briefly. Prepare your framing, focus, and exposure to shoot as soon as the reflection stabilizes.

Photographing Lac Sainte-Anne and Font Sancte

Lac Sainte-Anne is less dependent on reflections. Its strength primarily comes from the contrast between the color of the water and the mineral cirque that surrounds it. The cliffs, scree, and glacial forms give a much grander scale than that of Lac Miroir. The photographer should therefore avoid trying to fit everything into a single image.

Framing with a 24–70 mm lens generally allows you to retain the presence of the lake while giving weight to the peaks. The 70–200 mm becomes very useful for isolating a slope, a late-season snow patch, a rock texture, or the meeting of turquoise water and scree. A telephoto lens can also visually bring the summits and the chapel closer without having to stand too close to the banks.

The lake's color varies greatly depending on the light, sky, and viewing angle. Under harsh sunlight, the water can become very bright while the cliffs remain dark. Expose to preserve highlights and check the histogram. A polarizing filter can reduce certain reflections and reveal the color, but it can also make the sky too dark or create uneven polarization with a wide-angle lens.

The Sainte-Anne chapel provides a human scale and a historical landmark. It should remain an element of the landscape, not just a compositional accessory. During pilgrimages or gatherings, discretion is paramount: avoid disturbing participants or photographing identifiable individuals without their consent.

Photo tips for Lac Sainte-Anne

  • Use the curves of the bank to lead the eye towards Font Sancte.
  • Test a tight framing before choosing a very wide panorama.
  • Retain detail in the turquoise water: excessive saturation quickly gives an artificial result.
  • Take advantage of clouds to create alternating shadows and light on the scree.
  • Integrate a silhouette only when it provides a clear scale and remains discreet.
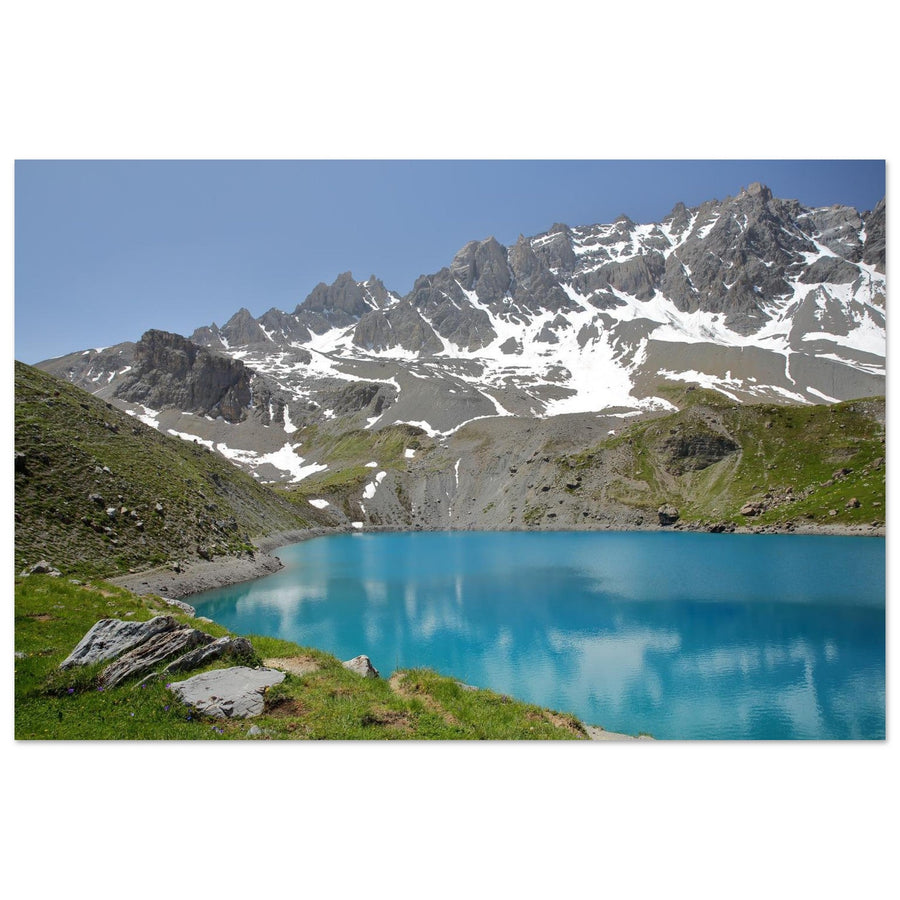
Photo print of Lac Sainte-Anne at the foot of Font Sancte in the Queyras
At Sainte-Anne, the cold color of the lake contrasts with the scree and cliffs of Font Sancte. Photography by Christophe Cappelli. Discover this Lac Sainte-Anne photo print.

Telling the transition between the two lakes

A coherent series should not be limited to two final views. The path between Lac Miroir and Sainte-Anne tells the progressive passage from a vegetative landscape to a mineral one. Photograph the signs of this transition: density of larches, reduction of grasses, appearance of schists, change in soil color, and opening of the sky.

The waterfalls and torrent of Mélézet can serve as an introduction. A slow shutter speed produces a smooth motion, but it's not always necessary. An intermediate speed retains more texture and better matches the lively character of mountain water. In the forest, look for areas where light filters through the branches rather than uniformly dark undergrowth.

Higher up, the resort facilities appear in places. Two choices are possible: exclude them by framing or intentionally integrate them to show the coexistence between landscape and human activity. The worst result is often a technical element cut off or forgotten at the edge of an image. Systematically check the angles before shooting.

This narrative approach is particularly well-suited for a report, a carousel, or a series of prints. It avoids repeating two postcards and shows Ceillac as a complete territory, from the forest to the high cliffs.

Sunrise, sunset, wind, and weather: when to visit?

Morning is the most strategic time for Lac Miroir. The wind is often weaker, the crowds are smaller, and contrasts are easier to control. Depending on the season, however, some parts of the lake may remain in shadow. This cool light is not a flaw: it suits calm images, deep greens, and subtle reflections.

At Sainte-Anne, a slightly more advanced light better reveals the color of the water and the volumes of the cirque. A completely clear sky gives a very graphic image, but contrasts can become harsh. High clouds or passing clouds often create a more balanced and interesting scene on the relief.

Late afternoon can produce beautiful shadows and side light, but it requires more rigorous organization for the return. The enclosed areas quickly lose direct light. You need to know the route, bring a headlamp, and not underestimate the time spent waiting for a break in the weather.

After a disturbance, clouds clinging to the summits can enhance the atmosphere. However, thunderstorms are a serious risk in this high-altitude and relatively open terrain. An uncertain forecast should lead to shortening the outing, not seeking a spectacular image at all costs.

Which season to choose to photograph Ceillac and its lakes?

Early summer: residual snow and cold waters

After the melt, snowfields can still highlight the relief around Sainte-Anne. The contrast between snow, rock, and water is interesting, but the trails can remain wet or snowy. Accessibility dates vary greatly from year to year.

Summer: easier access and vibrant colors

Summer generally offers the most regular access conditions. It is also the busiest period. To maintain a calm atmosphere and limit involuntary silhouettes, favor an early start and avoid peak days.

Autumn: golden larches at Lac Miroir

Autumn is the strongest season for the contrast between Lac Miroir and the larches. Yellows and oranges frame the water, while the summits may receive the first snow. The window is short: you need to monitor the evolution of colors and access conditions.

Winter: another photographic project

Snow completely transforms the area. Summer itineraries, avalanche risk, and travel conditions do not allow for simply transposing the advice in this guide. A winter outing requires preparation and skills adapted to snowy terrain.

How to capture reflections successfully at Lac Miroir?

The quality of a reflection primarily depends on the state of the water. No setting can compensate for a highly agitated surface. However, technique allows you to make the most of imperfect conditions. Use manual mode or aperture priority, then adjust sensitivity to maintain a shutter speed compatible with the movement of grasses and branches.

Excessively closing the aperture is not necessary. An aperture around f/8 to f/11 generally provides sufficient depth of field if the foreground is not too close to the lens. Focus on an intermediate zone and check the edges of the image. The tripod helps refine the framing, but it doesn't exempt you from checking the actual sharpness.

The polarizing filter should be used with caution. By removing surface reflections, it can precisely diminish the desired effect. Rotate it gradually and compare: partial polarization can enhance colors while maintaining the mirror. Also, take an image without a filter to keep several possible interpretations.

Finally, do not neglect fragmented reflections. A strip of sky, a few trees, and a water texture can produce a more personal photograph than a perfect symmetry seen many times before.

Eight composition ideas and suitable focal lengths

1. Simple symmetry at Lac Miroir

Place the shoreline near the center only when the reflection and the landscape present a real balance. A focal length of 24 to 35 mm is often sufficient.

2. Isolated larch and partial reflection

Use a tree as an anchor point, then let the reflection occupy only a part of the frame. 35 to 70 mm avoids scattering the composition too much.

3. Shoreline curve

Look for a natural curve that leads to the bottom of the lake. Check that the foreground grasses do not become a confused block.

4. Turquoise water and scree slopes at Sainte-Anne

Oppose a strip of colored water with a large mineral mass. The 24–70 mm allows you to precisely dose the place of each material.

5. Compression on Font Sancte

At 70–200 mm, isolate the reliefs, snowfields, and rock textures. This approach gives more power to the summits than an ultra wide-angle.

6. Chapel and human scale

Place the chapel in its environment rather than dead center. A normal focal length or a small telephoto lens avoids distortions.

7. Discreet silhouette on the trail

A distant person can give scale to the cirque. Wait for them to stand out clearly from the background and respect image rights.

8. Transition series

Build three coordinated images: forest and waterfall, vegetated Lac Miroir, mineral Lac Sainte-Anne. Maintain consistent processing to reinforce the narrative.

Three photo outing strategies

Option 1 — Priority to Lac Miroir

Start early from Mélézet, reach the lake before the wind picks up, and dedicate most of your time to the shores, reflections, and larches. This option is best suited for autumn or when the weather later deteriorates.

Option 2 — Both lakes in the same series

Follow the full loop, with a first stop at Lac Miroir then an ascent to Sainte-Anne. Allow much more than the official walking time, as both areas require different framing and lighting.

Option 3 — Priority to Sainte-Anne and Col Girardin

From the bottom of Chaurionde, focus the outing on Lac Sainte-Anne, the chapel, Font Sancte, and possibly the slope of Col Girardin. This option is better suited for a mineral project or telephoto work.

In all cases, adapt the program to the weather, the group's level, and the condition of the trails. A photographic guide does not replace either a recent hiking guide or hiking preparation.

What equipment and settings to bring?

  • 16–35 mm: useful for nearby shores, vertical compositions, and the Sainte-Anne cirque, without overusing it.
  • 24–70 mm: the most versatile lens for both lakes, waterfalls, and the transition between forest and scree slopes.
  • 70–200 mm: recommended for Font Sancte, textures, shoreline details, and compressing planes.
  • Tripod: useful at dawn, for refining reflections and maintaining a precise composition, but consider the elevation gain when carrying it.
  • Polarizing filter: to be used with caution at Lac Miroir; more relevant for controlling certain reflections at Sainte-Anne.
  • Rain protection: essential when cloud passages become rapid at altitude.
  • Headlamp: necessary for an early start before dawn or a late return.

As a base, work around f/8, ISO 100 to 400 depending on the light, and a shutter speed adapted to the wind. Exact values depend on the subject: a waterfall, a moving larch, a reflection, or a silhouette do not require the same setting. Check the histogram and sharpness rather than applying a fixed recipe.

Safety, dogs, drone, and site preservation

The loop of the two lakes is a high-altitude hike with nearly 800 meters of elevation gain. Bring water, warm and waterproof clothing, food, an offline map or track, a charged phone, and a headlamp. Consult the weather forecast and give up in case of a strong risk of thunderstorms or conditions incompatible with the group's level.

The shores of the lakes and wetlands are fragile. Stay on existing paths when possible, do not move stones to create a foreground, and do not trample vegetation to get a clearer reflection. A tripod does not justify leaving a stable area.

In the Queyras Regional Natural Park, local regulations notably require dogs to be kept on a leash in alpine pastures, forests subject to forestry regulations, and near herds. Check the applicable decree for Ceillac before your outing.

Drones are highly regulated. The Park notably indicates that recreational take-off, piloting, and landing from public land are prohibited within 200 meters of lakes, wildlife, refuges, cabins, alpine chalets, and livestock. It is also necessary to consult national airspace restrictions and the municipal decree of Ceillac. In practice, the lake area therefore requires precise verification and should never be considered free for flight.

Photo prints of Lac Miroir and Lac Sainte-Anne

The two artworks available in the gallery showcase the two main identities of Ceillac. They are offered as photo prints on matte Dibond aluminum, made to order. The support limits reflections and maintains excellent flatness, which is particularly suitable for rock details, water nuances, and transitions between shadow and light.

Lac Miroir in Ceillac

This photograph by Picturereflex emphasizes calm, larches, and the continuity between landscape and reflection.

View the photo print of Lac Miroir in Queyras

Lac Sainte-Anne at the foot of Font Sancte

The photograph by Christophe Cappelli highlights the turquoise water, mineral materials, and the grandeur of the high-altitude cirque.

View the photo print of Lac Sainte-Anne

Explore the collection

Discover all Queyras photo prints

FAQ — Ceillac, Lac Miroir and Lac Sainte-Anne

What is the difference between Lac Miroir and Lac Sainte-Anne?

Lac Miroir is surrounded by larches, grasses, and softer shores; it is particularly interesting for reflections. Lac Sainte-Anne is higher up in a mineral cirque dominated by Font Sancte, with turquoise water and a high mountain atmosphere.

Can both lakes be photographed in one day?

Yes, an official loop connects the two lakes. It covers approximately 13.3 kilometers and nearly 800 meters of positive elevation gain. You should add photo stops to the walking time and adapt the program to the weather and the group's level.

What is the best time to photograph Lac Miroir?

Morning is generally the most favorable, as the wind and crowds are often weaker. Calm water increases the possibilities for reflection, but cold light or a partial mirror can also produce good images.

What focal length to use at Lac Sainte-Anne?

The 24–70 mm is the most versatile for balancing the lake and the relief. A 70–200 mm allows you to give more weight to Font Sancte, isolate mineral textures, and avoid the reductive effect of an ultra wide-angle.

What is the best season to photograph Ceillac?

Summer offers the most regular access. Autumn is particularly interesting at Lac Miroir when the larches turn golden. In early season, residual snow can enrich Sainte-Anne, but the condition of the trails must be checked.

Does Lac Miroir have another name?

Yes. It is also called Lac des Prés Soubeyrand. Both names may appear on maps, signs, and documents related to Ceillac hikes.

Are dogs allowed around the Ceillac lakes?

The presence of dogs is regulated by municipal decrees. In the Queyras Park, they must be kept on a leash in alpine pastures, forests subject to forestry regulations, and near herds. Consult updated local rules before your departure.

Can a drone be used at Lac Miroir or Lac Sainte-Anne?

The area is highly regulated. Park rules and the municipal decree of Ceillac regulate take-off and flight, especially near lakes and wildlife. Check local texts and the official map of airspace restrictions before any use.

Back to blog